

Introduction
For today’s Arduino tutorial, we will learn how to use LCD display using Arduino by printing a table. For this Arduino project, we will print a table of 12 in the LCD display.
To build this Arduino project, you will need an LCD display, an Arduino board, and a breadboard and jumper wires to connect the two. The LCD display will have a set of 16 pins that will need to be connected to the Arduino.
Once you have the hardware set up, you will need to install a library for the LCD display in the Arduino software. This library will contain functions that you can use to control the display, such as setting the cursor position and writing text to the screen.
Supplies
To print a table in LCD display with the help of Arduino, we will require the following components:
Components
- Arduino Uno R3
- LCD 16×2
- 1 Small Breadboard
- 1 Resistor
- Connecting wires
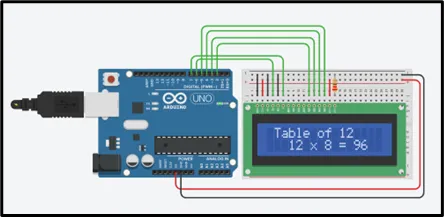
Circuit Diagram

Steps To Print A Table In LCD Display Using Arduino
Step 1: Gather all the components on the Digital Board or Physical Table.
LCD:
Step 2: First, connect the power and ground pins of the LCD to the power and ground pins of the Arduino.
Step 3: Then, connect the control pins of the LCD (such as RS, E, and R/W) to the digital output pins on the Arduino.
Step 4: You will also need to connect the data pins of the LCD to the digital output pins on the Arduino.
Source Code
#include<LiquidCrystal.h>

LiquidCrystal lcd(6, 7, 2, 3, 4, 5);

void setup()

{

lcd.begin(16, 2);

}

void loop()

{

lcd.setCursor(0,0);

lcd.print(" Table of 12 ");

delay(1000);

lcd.setCursor(2,1);

lcd.print(" 12 x 1 = 12");

delay(1000);


lcd.clear();


lcd.setCursor(0,0);

lcd.print(" Table of 12 ");

lcd.setCursor(2,1);

lcd.print(" 12 x 2 = 24");

delay(1000);

lcd.clear();


lcd.setCursor(0,0);

lcd.print(" Table of 12 ");

lcd.setCursor(2,1);

lcd.print(" 12 x 3 = 36");

delay(1000);

lcd.clear();


lcd.setCursor(0,0);

lcd.print(" Table of 12 ");

lcd.setCursor(2,1);

lcd.print(" 12 x 4 = 48");

delay(1000);

lcd.clear();


lcd.setCursor(0,0);

lcd.print(" Table of 12 ");

lcd.setCursor(2,1);

lcd.print(" 12 x 5 = 60");

delay(1000);

lcd.clear();


lcd.setCursor(0,0);

lcd.print(" Table of 12 ");

lcd.setCursor(2,1);

lcd.print(" 12 x 6 = 72");

delay(1000);

lcd.clear();


lcd.setCursor(0,0);

lcd.print(" Table of 12 ");

lcd.setCursor(2,1);

lcd.print(" 12 x 7 = 84");

delay(1000);

lcd.clear();


lcd.setCursor(0,0);

lcd.print(" Table of 12 ");

lcd.setCursor(2,1);

lcd.print(" 12 x 8 = 96");

delay(1000);

lcd.clear();


lcd.setCursor(0,0);

lcd.print(" Table of 12 ");

lcd.setCursor(2,1);

lcd.print(" 12 x 9 = 108");

delay(1000);


lcd.clear();


lcd.setCursor(0,0);

lcd.print(" Table of 12 ");

lcd.setCursor(2,1);

lcd.print(" 12 x 10 = 120");

delay(1000);


lcd.clear();


}
Explanation of the Code
1. We initially included the LiquidCrystal library for LCD display purposes.
2. Then, we created its object with the name LCD, in which we initialized it with the number of pins to which it is connected to the Arduino, starting from the enable pin of LCD.
3. In the setup function, we are configuring the LCD display, which will have 2 rows and 16 columns, and one character can be displayed in each cell.
4. In the loop function, we set the cursor to the appropriate cell using column and row numbers and then printed the text using the print() function and, at last, cleared the screen using the clear() function.
5. The delay function used here will take time in milliseconds.
Output
On starting the simulation, the table of 12 will be displayed on the LCD screen.
Overall, creating this Arduino project is a fairly simple process that can be accomplished with just a few connections and a bit of code. It can be a useful tool for displaying data or creating interactive projects.