

In this Arduino tutorial we’ll connect NeoPixel Strip 6 with Arduino. The NeoPixel Strip 6 specifically refers to a strip that contains six of these individually addressable LEDs. Due to its small size, it is perfect for hobbyists and designers who wish to integrate colorful lighting into their projects without consuming a lot of space or power.
Introduction
Our code will continuously set all the LEDs of the NeoPixel Strip 6 to the same random color, changing to a new random color approximately every 300 milliseconds (6 LEDs x 50 milliseconds delay). This will create a flashing random color effect across the entire strip. By combining NeoPixel Strip 6 with Arduino, users can:
- Effortless Control: Create custom lighting sequences, animations, and patterns by writing simple Arduino code.
- Interactive Projects: Integrate sensors or input devices to make the NeoPixel react to the environment or user actions.
- Compact Design: With just 6 LEDs, it’s feasible to embed the NeoPixel Strip into wearable tech, small crafts, or tight spaces.
- Expandability: Multiple NeoPixel strips can be chained together, all controlled by the same Arduino board, allowing for larger, more intricate displays.
Supplies
In order to connect NeoPixel Strip 6 with Arduino, we will require the following components:
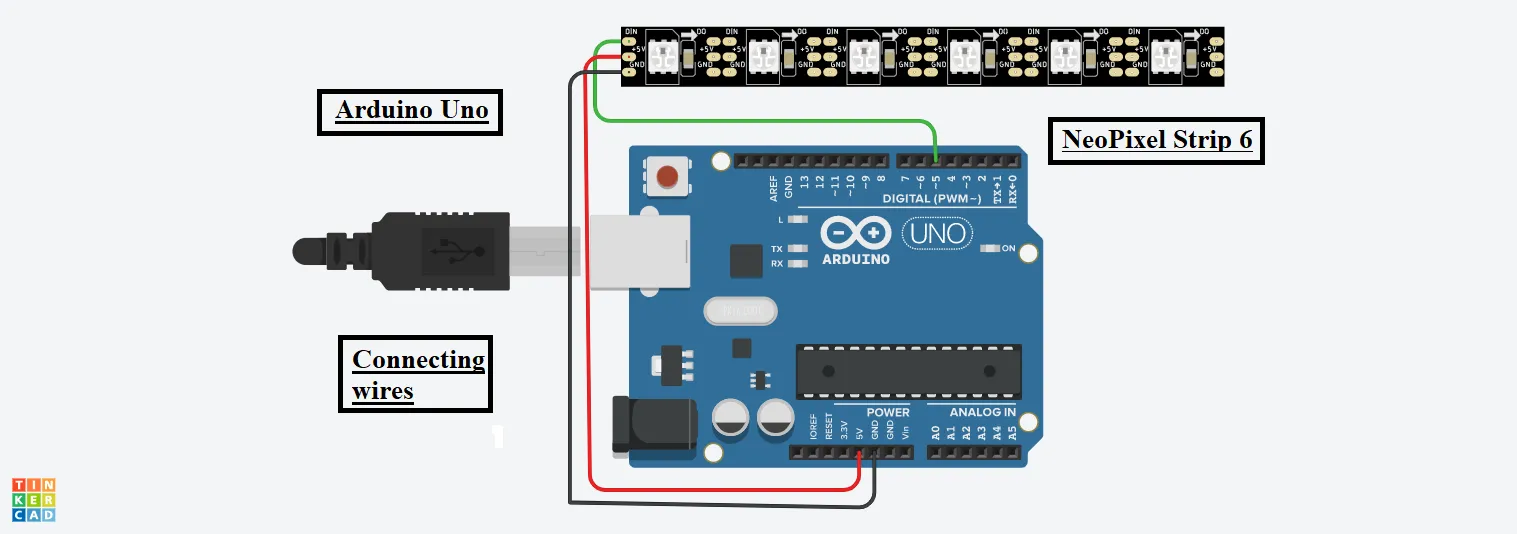
- Arduino Uno
- Connecting wires
- NeoPixel Strip 6
Circuit Diagram
Steps To connect NeoPixel Strip 6 with Arduino
Step 1: Gathering all required components like Arduino and NeoPixel.
NeoPixel Strip 6:
Step 2: Connect the Input pin of the NeoPixel to the Digital Pin 5 of Arduino.
Step 3: Connect the GND Pin of NeoPixel to the GND pin of the Arduino.
Step 4: Connect the Power pin of NeoPixel to the 5V of the Arduino.
Source Code
#include <Adafruit_NeoPixel.h>

#define PIN 5

Adafruit_NeoPixel strip = Adafruit_NeoPixel(6, PIN, NEO_GRB + NEO_KHZ800);

void setup()

{

strip.begin();

}

void loop()

{

int c1 = random(0, 255);

int c2 = random(0, 255);

int c3 = random(0, 255);


for(int k = 0; k < 6; k++)

{

strip.setPixelColor(k, strip.Color(c1, c2, c3));

strip.show();

delay(50);


if (k == 6)

{

k = 0;

}

}

}
Explanation of the Code
1. At the start, we included a library for the Neopixel Strip. Then we have defined a variable to 5.
2. We are passing three parameters in the object of the Neopixel library which includes the total neopixels in the strip, pin number of Arduino to which the NeoPixel strip 6 is connected and the frequency along with its colour code.
3. In the setup function, we are beginning the strip. We have used three variables which will get a random number from 0 to 255.
4. Now, using a for loop we are setting the pixel colour in the strip and using the show function we are displaying the colours to each neopixels of the NeoPixel Strip 6.
5. The random function used here, will generate a random number wrt the given two integer arguments in it.
Output
Click on start simulation, if you are using a website to create an online project.
![]()
Else switch ON the arduino, an amazing look of the NeoPixel Strip 6 is waiting for you!.