

Introduction
For this Arduino project, we will use a Photoresistor Sensor to glow LED using Arduino.
A Photoresistor sensor changes its resistance when light shines on it, and hence it is used to detect the presence of light. Along with it, the Arduino code does magic.
The objective of this Arduino project is that we will increase the intensity of the LED as the photoResistor sensor will get Light. The components can be purchased from any electronics center. To build online projects, the TinkerCad website can be used.
Supplies
In order to use a Photoresistor Sensor to glow LED using Arduino, we will require the following components:
Components
- Arduino Uno R3
- Photoresistor Sensor
- 1 Small BreadBoard
- 1 LED
- 2 Resistors
- Connecting wires
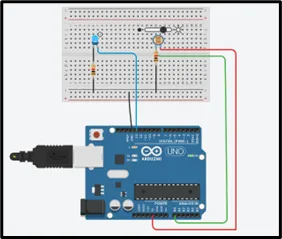
Circuit Diagram

Steps To Use Photoresistor Sensor To Glow LED Using Arduino
Step 1: Gather all the components on the Digital Board or Physical Table.
Step 2: Plug the LED and Photoresistor Sensor into the Breadboard.
LED:
Step 3: Connect the Cathode Terminal of the LED to the resistor’s one end and the second end of the resistor to the Ground(GND) pin of the Arduino at its Digital Side.
Step 4: Connect the Anode terminal of the LED to the 13-number pin of the Arduino on the Digital side.
PhotoResistor Sensor:
Step 5: Connect One terminal of the Photoresistor sensor to the 5V pin of the Arduino at its Analog Side.
Step 6: Connect the Second Terminal of it to the A0 pin of the Arduino at its analog side.
Step 7: Connect the same second terminal of the sensor to the resistor and the resistor to the Ground.
Source Code
int psensorValue = 0;

void setup()

{

pinMode(A0, INPUT);

Serial.begin(9600);

pinMode(13, OUTPUT);

}

void loop()

{

psensorValue = analogRead(A0);


Serial.println(psensorValue);


analogWrite(13, map(psensorValue, 0, 1023, 0, 255));

delay(1000);

}
Explanation of the Code
1. At the beginning, we initialized one integer type of variable, namely psensorValue, to 0.
2. After that, we used two functions, namely setup, and loop.
3. In the setup function, we have configured pin number A0 for the Input purpose and 13 for the Output purpose.
4. Also, we have set the speed of the serial connection to 9600 bits per second.
5. Now, in the loop function, we are reading the Analog input from pin A0 and storing it in the variable declared.
6. After that, we are printing the value to the serial monitor.
7. Now, we are mapping the sensor value, which ranges from 0 to 1023, to the LED, which ranges from 0 to 255, to the output pin 13.
8. Also, we are using a delay function here, which takes time in milliseconds.
Output
On changing the intensity of the light source, the intensity of the LED will also change in the same proportion.
Here, in the output above, the intensity of the source light is high. Hence the intensity of LED light is also high.
A similar type of thing is used in our mobile phones when we set it to AutoBrightness.