

Introduction of the Project
Are you ready to upgrade your bathroom or kitchen sink with a touch-free, automatic sensor tap? Building your own DIY Automatic Sensor Tap with Arduino is a great way to add a modern, high-tech element to your home or workspace. Not only will it impress your guests, but it can also help save water and prevent the spread of germs. With my expertise in Arduino technology, I can guide you through the process and help you create a fully functioning sensor tap that will make your life easier and more hygienic.
To build this Arduino project, we will use a PIR motion sensor to detect the presence of the hand and will use a servo as a tap. So, let’s roll up our sleeves and get started on this exciting project!
Supplies
In order to make an Automatic Sensor Tap with Arduino, we will use the following components:
Components
- Arduino Uno R3
- PIR Sensor
- Micro Servo
- Connecting Wires
We have used the TinkerCad website to build our project. To do physical projects, you can purchase the components online or from any electronics center.
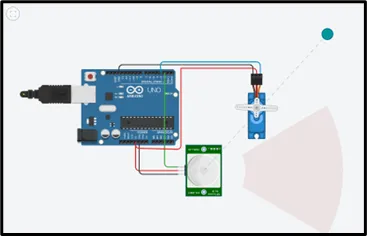
Circuit Diagram

Steps To Build An Automatic Sensor Tap With Arduino
Step 1: Gather all the components on the Digital Board or Physical Table.
PIR Sensor:
Step 2: Connect the Ground terminal of the PIR sensor to the GND pin of the Arduino.
Step 3: Connect the Power terminal of the PIR sensor to the 5V pin of the Arduino.
Step 4: Connect the Signal terminal of the PIR sensor to the 2-number pin of the Arduino.
Micro Servo:
Step 5: Connect the Power terminal of the micro servo to the 5V pin of the Arduino.
Step 6: Connect the Signal terminal of the micro servo to the 3-number pin of the Arduino.
Step 7: Connect the Ground terminal of the micro servo to the GND pin of the Arduino.
Source Code
#include <Servo.h>

Servo s;

int presence = 90;

void setup()

{

Serial.begin(9600);

pinMode(2, INPUT);

s.attach(3);

s.write(90);

}

void loop()

{

presence = digitalRead(2);


Serial.print(presence);

if( presence == 1)

{

s.write(0);

}

if(presence == 0)

{

s.write(90);

}

}
Explanation of the Code
1. First, we included the Servo library.
2. Then, we declared one object of servo “s” and initialized another integer variable, “presence” to 90.
3. In the setup function, we are configuring the pin mode of the Arduino for input purposes. We have used serial.begin, to establish a serial connection with 9600 bits per second.
4. Next, we attached pin number 3 of the Arduino to the servo, and initially, writing it to 90 degrees means the tap will be initially in a close position.
5. Now, in the loop function, we are reading input from pin number 2 of the Arduino, which will tell us if there is any motion near to tap or not. We are storing the value in the presence variable.
6. After that, we use the if statement to change the direction of the servo wrt the presence variable. We have used the write function to change the orientation of the servo.
Output
We will get the following output on the successful completion of the project.
On starting the simulation, if our hand is near the tap, in the range of the sensor, the tap will open, and the servo will be at 0 degrees, else it will be closed(90 degrees).