

Introduction of the Project
Illuminate your home with our one-of-a-kind eco-friendly Diya with Arduino that will wow your friends and family. Our step-by-step instructions will lead you through the process of building a sustainable and stylish Diya that not only adds a warm glow to your home but also reduces your environmental impact. With detailed instructions, you’ll be able to craft a one-of-a-kind masterpiece that incorporates personalized light patterns controlled by Arduino.
To build this Arduino project, we will use colorful LEDs to design a Diya, which can be used on various festive occasions like Diwali, New Year, etc. So, get your creative juices flowing and start building your own Eco-Friendly Diya With Arduino today!
Supplies
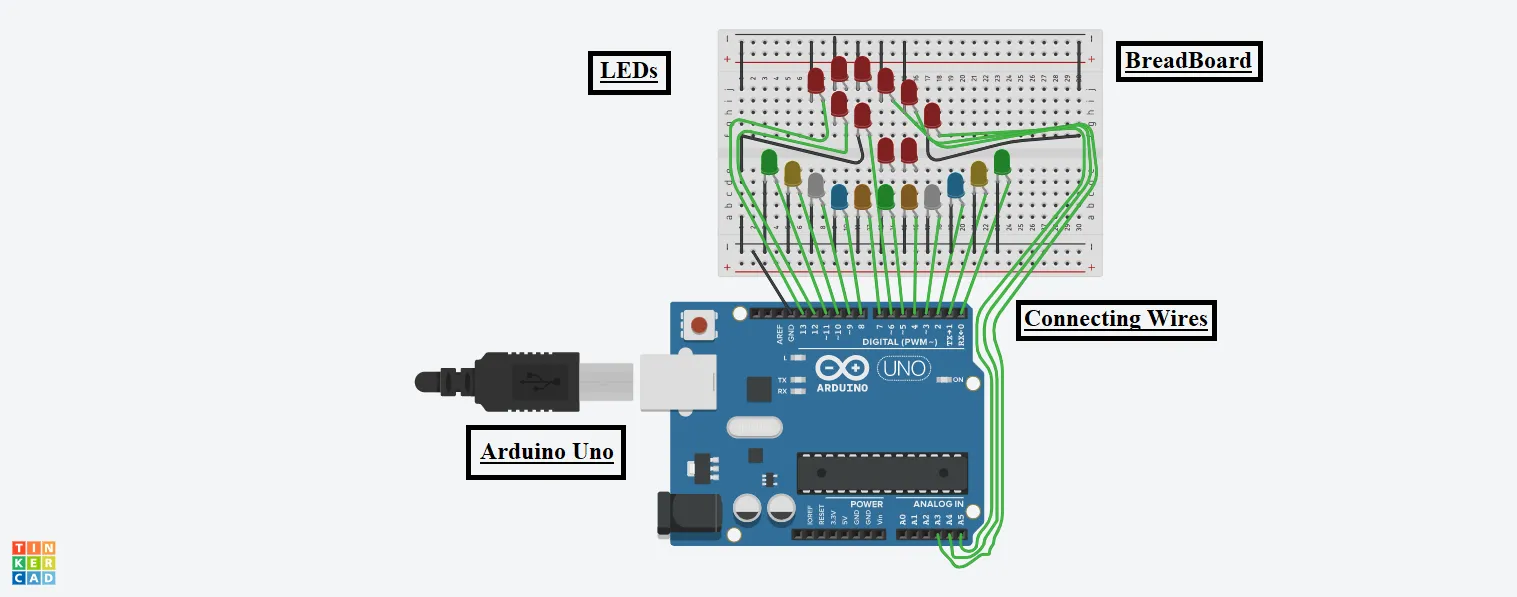
In order to make an Eco-Friendly Diya with Arduino, we will require the following components:
Components
- Arduino Uno R3
- 21 Colorful LEDs
- 1 Small Breadboard
- Connecting wires
Circuit Diagram
Steps To Build An Eco-Friendly Diya With Arduino
Step 1: First, gather the required components on the Digital board or physical table.
LEDs:
Step 2: Connect the Cathode terminals of all the LEDs to the GND pin of the Arduino.
Step 3: Connect the Anode terminal of all the LEDs to the different pin numbers of the Arduino from 0 to A5.
Source Code
void setup()

{

pinMode(0, OUTPUT);

pinMode(1, OUTPUT);

pinMode(2, OUTPUT);

pinMode(3, OUTPUT);

pinMode(4, OUTPUT);

pinMode(5, OUTPUT);

pinMode(6, OUTPUT);

pinMode(7, OUTPUT);

pinMode(8, OUTPUT);

pinMode(9, OUTPUT);

pinMode(10, OUTPUT);

pinMode(11, OUTPUT);

pinMode(12, OUTPUT);

pinMode(13, OUTPUT);

pinMode(A3, OUTPUT);

pinMode(A4, OUTPUT);

pinMode(A5, OUTPUT);

}

void loop()

{

digitalWrite(0, HIGH);

digitalWrite(1, HIGH);

digitalWrite(2, HIGH);

digitalWrite(3, HIGH);

digitalWrite(4, HIGH);

digitalWrite(5, HIGH);

digitalWrite(6, HIGH);

digitalWrite(7, HIGH);

digitalWrite(8, HIGH);

digitalWrite(9, HIGH);

digitalWrite(10, HIGH);

digitalWrite(11, HIGH);

digitalWrite(12, HIGH);

digitalWrite(13, HIGH);

digitalWrite(A3, HIGH);

digitalWrite(A4, HIGH);

digitalWrite(A5, HIGH);

}
Explanation of the Code
The source code for this Arduino project is very simple and can be divided into two functions, namely setup() and loop().
1. In the setup function, we have configured the pins of the Arduino for output purposes to glow the LEDs.
2. In the loop function, we digitally write all the pin numbers of the Arduino as High to whichever we have connected the LED. The loop function will keep looping until the power is supplied to the Arduino or the Simulation is ON.
Output
The final output of this eco-friendly diya with Arduino will look something like this.
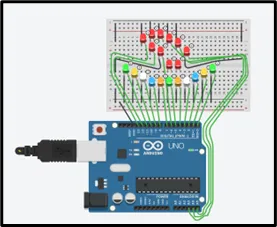
On starting the simulation, all the connected LEDs will glow, and our diya design will give a fantastic look as per one’s creativity.